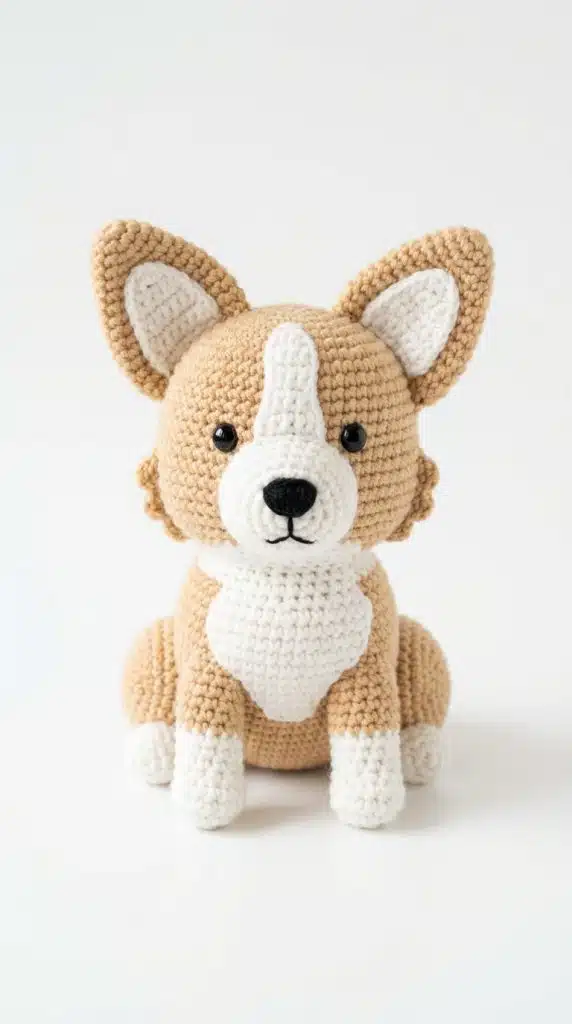
The Corgi’s fluffy butt is created by working the back haunches as larger, rounder pieces than the front legs, stuffing the paw end firmly and the upper section softly, and attaching them at a wide outward angle. The short legs get their stubby proportions by keeping the leg tube short — usually 5 to 7 rounds — at a smaller stitch count than the body.
Here’s a quick summary of what makes both features work:
- Back haunches are bigger than front legs — this is the single most important size difference that defines the Corgi’s wide seated silhouette.
- The fluffy effect comes from yarn choice, not a special stitch — a brushed mohair held alongside your main yarn does the work.
- Stuffing technique matters — firm at the paw, soft toward the top creates the natural seated splay.
- Short legs need a deliberate stitch count — resist the urge to add extra rounds; length is what makes them look like a Corgi or a Labrador.
- Attachment angle is everything — back legs splay outward and slightly downward; front legs angle slightly forward and out.
- Gauge affects proportions — always check your tension before starting the legs so they scale correctly to the body.
- The “butt fur” look requires one extra step after assembly — a quick brush with a pet slicker brush on the haunches after finishing opens up the fibers and creates that signature fluffy poof.
Why The Corgi’s Proportions Are Tricky To Get Right
The Corgi is a dwarf breed — technically called achondroplastic — meaning its legs are deliberately short relative to its body length. That’s not just a cute quirk. It’s a specific structural proportion that your amigurumi needs to replicate to look like a Corgi and not just a round dog.
In my experience, most beginners make one of two mistakes. Either the legs come out too long because it feels wrong to stop so early, or the back haunches aren’t wide enough because they’re worked at the same stitch count as the front legs.
The fix is intentional asymmetry between front and back. The back haunches need to be noticeably wider and rounder — think of them more like small bowls than tubes — while the front legs are tighter, shorter cylinders. Once that proportion clicks, the seated Corgi pose falls into place almost automatically.
What Yarn To Use For The Fluffy Butt Effect
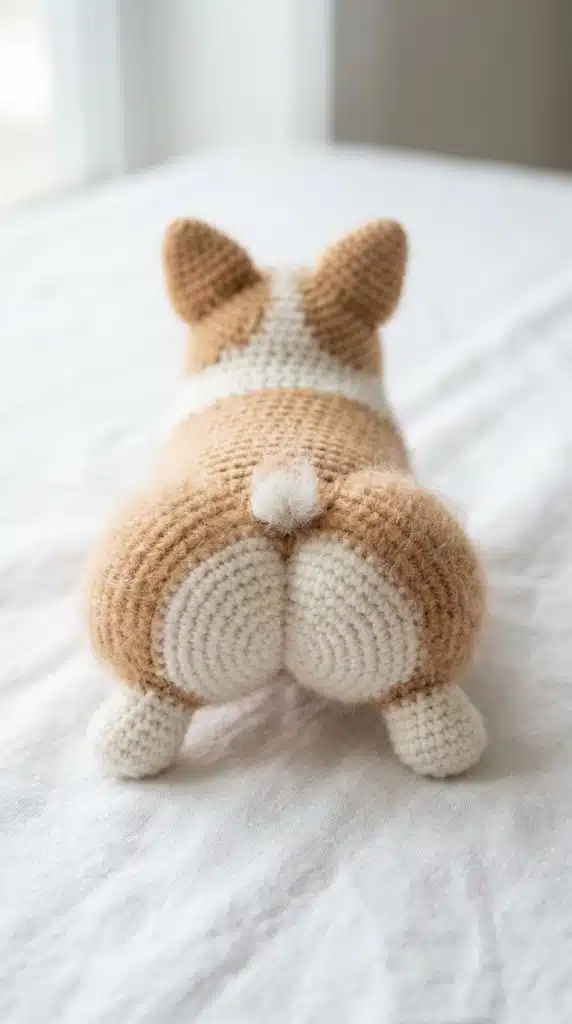
The fluffy butt is the feature that gets the most Pinterest saves and the most “how did you do that?” comments. The good news is that it’s not a complicated stitch technique — it’s entirely about yarn choice.
The Double-Strand Method
The most reliable approach is holding two strands together as you work the back haunches only:
BEFORE YOU SCROLL PAST
Most Popular This Week: 👇
👉 Free Cocker Spaniel Crochet Pattern Beginner Friendly
👉 Border Collie Crochet Pattern Ideas
- Strand 1: Your main worsted weight yarn in the Corgi’s coat color (Lion Brand Pound of Love in “Buff” is a near-perfect fawn match)
- Strand 2: A thin brushed mohair in the same color family (Lion Brand Go For Faux or a budget mohair blend from Michaels both work well)
Work the haunches with both strands held together. Work everything else — the body, head, front legs — in your main yarn only. The contrast in texture between the smooth body and the fluffy haunches is exactly what makes the Corgi’s iconic rear end read so clearly.
The Post-Finishing Brush
After the piece is fully assembled, use a fine pet slicker brush on the back haunches in short, gentle downward strokes. This pulls the mohair fibers outward and creates a soft halo that photographs beautifully against light backgrounds.
In my opinion, this one extra step is the difference between a nice amigurumi and a Pinterest-viral amigurumi. It takes about two minutes and costs nothing extra.
Get Free Patterns Every Week!
Get new patterns, videos & tutorials free in your inbox
🔒 No spam. Unsubscribe anytime.
Step-By-Step: Crocheting The Back Haunches
These instructions are written for a standard worsted weight (#4) Corgi at approximately 6 inches tall seated, using a US G/6 (4.0mm) hook. Make two.
1. Start with a magic ring. Work 6 single crochet into the ring and pull tight. This is the paw base.
2. Round 2 — Increase round. Work 2 sc in each stitch around. [12 stitches]
3. Round 3 — BLO round. Work 1 sc in the back loop only of each stitch. [12] This creates the paw ridge line that separates the foot from the leg.
4. Round 4 — First shape round. (sc, inc) × 6. [18] This is where the haunch starts to widen — don’t skip this increase or the haunch will come out too narrow.
5. Rounds 5–6 — Even rounds. Sc around. [18] Two plain rounds to build the haunch width.
6. Round 7 — Decrease round. (sc, dec) × 6. [12] Begin stuffing now. Pack the paw end firmly with polyester fiberfill before the opening narrows further.
7. Rounds 8–9 — Upper leg rounds. Sc around. [12] Stuff the upper section very lightly — softer than the paw end. This soft-top, firm-bottom stuffing creates the natural seated splay when attached.
8. Fasten off. Leave a 10-inch tail for sewing. Do not close the opening — it will be sewn flat to the body.
💡 Tip: Pin both back haunches to the body before sewing a single stitch. Step back and look at the piece from directly in front. The haunches should angle outward at roughly 45 degrees from the body sides, sitting low near the base of the body — not halfway up.
Step-By-Step: Crocheting The Short Front Legs
The front legs are simpler than the haunches — shorter, slimmer, and with a less dramatic paw base. Make two.
1. Magic ring, 6 sc. [6]
2. Round 2 — Increase. 2 sc in each stitch. [12]
3. Round 3 — BLO. Sc in back loop only around. [12] Paw ridge.
4. Round 4 — Decrease. (sc, dec) × 4. [8] The front leg narrows faster than the haunch — this is intentional.
5. Rounds 5–9 — Leg tube. Sc around for 5 rounds. [8] This is where most people accidentally add extra rounds. Stop at Round 9. The leg should look almost comically short at this stage — that’s correct.
6. Stuff lightly throughout. Front legs should be soft enough to drape gently against the body rather than sticking out rigidly.
7. Fasten off with a 10-inch tail.
💡 Tip: Sew the front legs to the lower front sides of the body, angling slightly outward and forward. The top of the front leg should sit about 3 rounds below the base of the neck join — higher placement makes the Corgi look like it’s standing; lower placement gives the natural seated pose.
Common Mistakes And How To Fix Them
Even experienced crocheters run into the same issues with Corgi legs and haunches. Here are the most common ones.
Mistake 1 — Legs that are too long. It genuinely feels wrong to stop the leg tube so early. But every extra round moves the finished piece further from Corgi proportions. If your seated Corgi looks more like a Beagle than a Corgi, the legs are probably 2–3 rounds too long.
Mistake 2 — Haunches that are too small. If you worked the back haunches at the same stitch count as the front legs, they’ll look identical from behind. The back haunches need that wider, rounder shaping to create the signature wide-seated butt view that makes Corgis so recognizable.
Mistake 3 — Wrong attachment angle. Legs sewn straight down instead of angled outward flatten the silhouette completely. The characteristic Corgi wide stance comes entirely from the attachment angle, not the leg construction itself.
Mistake 4 — Over-brushing the mohair. One or two gentle passes with the slicker brush is enough. Over-brushing pulls fibers out of the stitches and creates thin patches instead of an even fluffy coat.
Expert Tips For A More Polished Finish
According to the Craft Yarn Council, amigurumi construction quality depends heavily on consistent tension throughout all pieces — even a half-size difference in tension between the front and back legs creates visible asymmetry in the assembled piece.
A few tips that make a real difference:
- Always make both legs in the same session. Tension naturally shifts slightly between different days or moods, and same-session pairs are almost always more consistent.
- Use a stitch marker every single round, not just at the start — miscounts on the increase and decrease rounds are the leading cause of asymmetric haunches.
- Photograph the assembled piece from directly behind before finalizing any leg attachment. The fluffy butt and wide haunch splay should be clearly visible from this angle — if it isn’t, the haunches need to be repositioned before the final stitches go in.
In my experience, the back view is actually the most satisfying angle on a finished Corgi amigurumi — and it’s the shot that consistently gets the most saves on Pinterest.
Frequently Asked Questions
What Hook Size Should I Use For Corgi Legs?
Use a US G/6 (4.0mm) hook for worsted weight yarn, which gives the firm, closed fabric that keeps stuffing from showing through. For DK weight, drop to a US E/4 (3.5mm) hook.
How Do I Stop The Legs From Flopping After Assembly?
Make sure the upper leg is stuffed softly, not firmly — overstuffed legs stick outward rather than sitting naturally. Also check that the attachment stitches go through at least two full layers of fabric on both the leg and the body.
Can I Use A Different Yarn For The Fluffy Butt?
Yes — any brushed mohair or fluffy blend held alongside your main yarn works. Red Heart’s Soft Essentials and Lion Brand Go For Faux are both easy to find at US craft stores and budget-friendly for small amounts.
Why Do My Haunches Look Lopsided?
Lopsided haunches almost always come from a stitch count error in the increase or decrease rounds. Count at the end of every round without exception, and compare both finished haunches side by side before sewing — they should be nearly identical in size and shape.
How Do I Get The Wide Corgi Stance In A Seated Pose?
Pin the haunches at a 45-degree outward angle from the body base and let the piece sit for a few minutes before sewing. The seated splay should be clearly visible from directly behind before any sewing begins.
Is The Fluffy Butt Technique Suitable For Beginners?
Absolutely — the double-strand method requires no special stitches. If you can work a standard magic ring and single crochet round, you can achieve the fluffy butt effect on your first try.
Final Thoughts
The Corgi’s fluffy butt and short legs are genuinely the features that make the finished amigurumi go from cute to completely iconic. And once you understand the logic — wide haunches, deliberate short leg tubes, angled attachment, and a quick brush of mohair — it all clicks into place.
Choose the right yarn combination, trust the stitch counts even when the legs look too short, and take the extra two minutes to brush the haunches after assembly. Those small details are what make the difference between a finished piece that sits in a drawer and one that gets photographed and shared.
Snap a photo of your finished Corgi from directly behind and share it on Pinterest — that fluffy butt shot is genuinely one of the most saved images in the crochet niche, and your version deserves to be part of that collection. Happy crocheting! 🐾