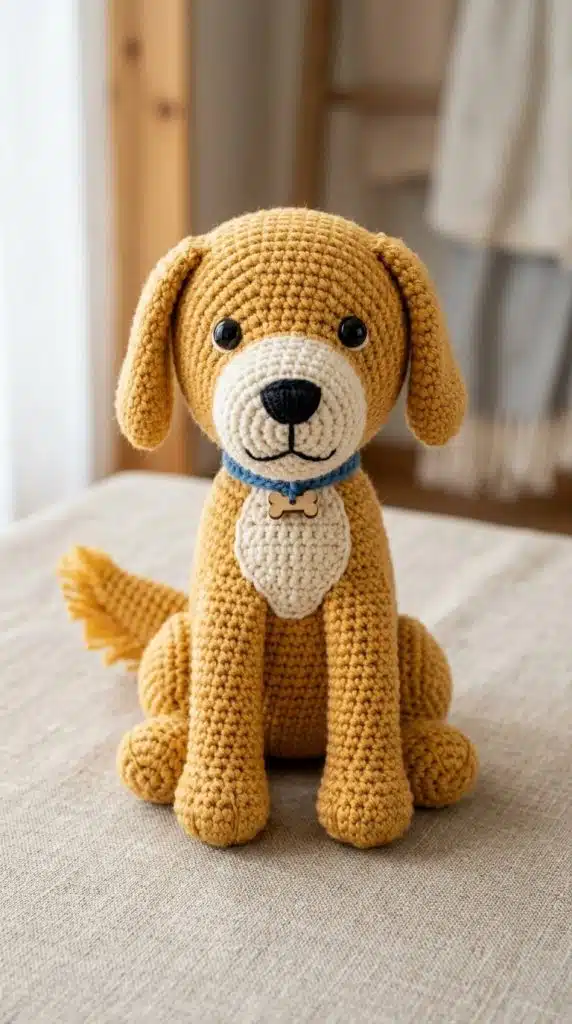
The Golden Retriever is one of the most instantly recognizable dog breeds in the world, defined by its flowing warm golden coat and soft, expressive floppy pendant ears.
These two features alone make a crocheted Golden Retriever amigurumi deeply satisfying and immediately identifiable in yarn.
Golden Retrievers are consistently ranked among the most beloved family dogs, adored for their gentle temperament and joyful, loyal personalities. A handmade Golden Retriever amigurumi makes a deeply meaningful gift for any Goldie owner, dog lover, or as a treasured pet memorial keepsake.
This pattern is 100% free — no sign-up, no email, and no download required. It includes full round-by-round instructions, a complete materials list, a step-by-step assembly guide, and color guidance for all major Golden Retriever coat shades — let’s get started.
Pattern At A Glance
| Detail | Info |
|---|---|
| Skill Level | Beginner – Intermediate |
| Finished Size | Approx. 6 inches tall seated |
| Yarn Weight | Worsted weight (#4) |
| Hook Size | US G/6 (4.0mm) |
| Stitches Used | Single crochet, slip stitch |
| Techniques Used | Magic ring, invisible decrease, BLO, continuous rounds |
| Time to Complete | 6–10 hours |
| Stuffing Needed | Polyester fiberfill, medium amount |
| Safety Eyes | 12mm, black |
| Number of Pieces | 11 — Head, Snout, 2 Floppy Ears, Body, 2 Front Legs, 2 Back Legs, Feathered Tail, Chest Patch |
| Yarn Colors Needed | 2 colors (warm golden main coat, cream chest patch and snout) |
| Best Occasion / Use | Gift, keepsake, pet memorial, nursery decor, display piece |
Materials You Will Need
Gather all materials before starting — swapping yarn mid-project at worsted weight creates visible texture and tension differences between pieces.
Yarn
- Main Coat Color — Approx. 150–180 yds — Lion Brand Pound of Love “Honey” — the warm amber-gold tone matches the classic Golden Retriever coat with clean, defined stitch texture.
- Snout and Chest Patch — Approx. 30–40 yds — Lion Brand Pound of Love “Antique White” — the lighter ivory tone recreates the subtle cream feathering on the chest and muzzle typical of light-coated Goldies.
- Nose and Facial Details — Approx. 5 yds — Black embroidery floss — use for the embroidered nose block, mouth line, and optional eyebrow stitches.
Tools & Notions
- US G/6 (4.0mm) crochet hook
- Polyester fiberfill — SEE THIS PRODUCT: Poly-Fil Premium Fiberfill
- 12mm black safety eyes — SEE THIS PRODUCT: 12mm Black Safety Eyes
- Tapestry needle
- Stitch marker
- Scissors
- Straight pins
- Pet slicker brush — for brushing the finished tail and ear edges to create soft feathered fringe — SEE THIS PRODUCT: Craft Pet Slicker Brush
🛒 Yarn Tip: For the most accurate warm golden coat, choose a yarn with an amber undertone rather than a yellow one — Lion Brand Pound of Love “Honey” at Michaels or Walmart gives the breed’s characteristic rich, saturated golden tone.
Abbreviations & Stitch Guide
This pattern uses US crochet terminology throughout.
| Abbreviation | Meaning |
|---|---|
| MR | Magic ring |
| ch | Chain |
| sl st | Slip stitch |
| sc | Single crochet |
| inc | Increase — 2 sc in 1 st |
| dec | Decrease — sc2tog (invisible decrease) |
| BLO | Back loops only |
| FLO | Front loops only |
| st(s) | Stitch(es) |
| rnd | Round |
| R | Round |
| Row | Row (flat sections only) |
| rep | Repeat |
| ( ) x# | Repeat instructions in brackets x times |
| [ ] | Stitch count at end of round |
💡 Invisible Decrease Tip: Insert the hook under the front loop only of the next stitch, then the front loop only of the following stitch, and complete as a normal single crochet. This keeps the surface smooth and gap-free — essential for the Golden Retriever’s broad, rounded head and gently curved snout shaping.
Before You Begin
- Spiral rounds: This pattern is worked in continuous spiral rounds — do not join rounds or add a turning chain unless rows are specifically indicated.
- Stitch marker: Place a stitch marker at the first stitch of each round and move it up as you go to avoid losing your count.
- Both loops: Work through both loops of every stitch unless the pattern specifically calls for FLO or BLO.
- Stuffing: Stuff each piece firmly as you go — do not wait until the piece is fully closed to begin adding stuffing.
- Tension: Tight, even tension matters more than matching exact gauge for amigurumi — adjust hook size down if stuffing shows through your stitches.
Gauge
Gauge: 4 stitches x 4 rows = 1 inch in single crochet using US G/6 (4.0mm) and worsted weight yarn.
For amigurumi, tight tension matters more than exact gauge — the fabric should be firm enough that no stuffing shows through when stretched gently.
Free Golden Retriever Crochet Pattern — Complete Instructions
CONSTRUCTION OVERVIEW
Get Free Dog Health Tips!
Weekly guides on keeping your dog healthy & happy
🔒 No spam. Unsubscribe anytime.
Here is how this Golden Retriever amigurumi is built before you begin.
- All major pieces — head, body, ears, legs, tail, and chest patch — are crocheted separately in continuous rounds and assembled at the end.
- The snout and chest patch use short oval chain foundations and are worked flat before being sewn onto the head and body.
- The floppy ears are crocheted in rounds, folded flat, and closed with single crochet through both layers before sewing onto the head.
- The feathered tail is a tapered tube and can be lightly brushed with a pet slicker brush after assembly for a fluffy, breed-accurate finish.
- Assemble in this order: face embroidery → snout → ears → head to body → front legs → back legs → tail → chest patch → ends.
- The snout color is lighter cream yarn; all other pieces including the ears use the same warm golden honey yarn for full coat consistency.
PATTERN INSTRUCTIONS
All pieces are made separately and assembled at the end — most parts are worked in continuous rounds with no slip stitch joins — use a stitch marker at the start of each round and count stitches every round.
Head
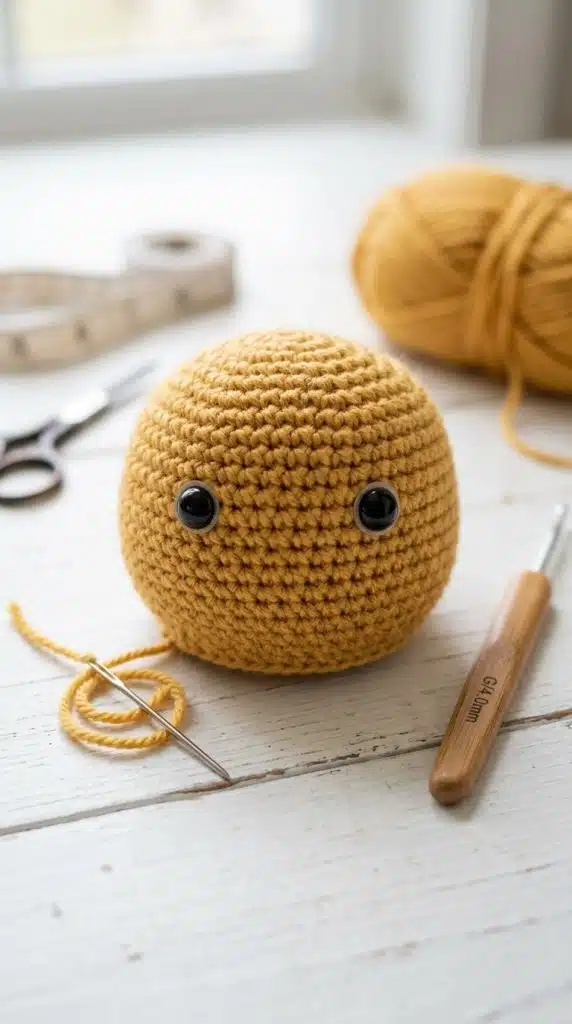
Honey Yarn.
The Golden Retriever’s head is broad, gently domed, and rounded — getting this shape right is the foundation for the wide-set eyes and softly framing floppy ears that define the breed’s expression.
Rnd 1: MR, 6 sc into ring. [6]
Rnd 2: inc in each st around. [12]
Rnd 3: (1 sc, 1 inc) x 6. [18]
Rnd 4: (2 sc, 1 inc) x 6. [24]
Rnd 5: (3 sc, 1 inc) x 6. [30]
Rnd 6: (4 sc, 1 inc) x 6. [36]
Rnd 7: (5 sc, 1 inc) x 6. [42]
Rnd 8–11: sc in each st around. [42] (4 rounds)
→ Insert 12mm black safety eyes between Rnd 9 and 10, approximately 8 stitches apart, centered on the face just above the midpoint.
Rnd 12: (5 sc, 1 dec) x 6. [36]
Rnd 13: (4 sc, 1 dec) x 6. [30]
Rnd 14: (3 sc, 1 dec) x 6. [24]
→ Begin stuffing the head firmly at this point; continue adding stuffing as the opening closes.
Rnd 15: (2 sc, 1 dec) x 6. [18]
Rnd 16: (1 sc, 1 dec) x 6. [12]
Rnd 17: dec x 6. [6]
Fasten off. Leave a 30cm yarn tail for sewing.
💡 Head Tip: Stuff the head extra firmly before closing — the Golden Retriever’s broad skull needs solid structure to support the weight of the floppy ears without tilting forward once the piece is fully assembled.
Snout

Antique White Yarn.
The Golden Retriever’s snout is medium-length, broad, and slightly rectangular — this piece anchors the nose embroidery and gives the breed its characteristic open, friendly expression.
Rnd 1: MR, 6 sc into ring. [6]
Rnd 2: inc in each st around. [12]
Rnd 3: (1 sc, 1 inc) x 6. [18]
Rnd 4: (2 sc, 1 inc) x 6. [24]
Rnd 5: sc in each st around. [24]
Rnd 6: sc in each st around. [24]
→ Do not overstuff — pinch the snout into a gentle rectangular shape with your fingers before sewing to maintain the Golden’s wide, flat muzzle profile.
Fasten off. Leave a 14-inch tail for sewing to the head.
Floppy Ears (Make 2)
Honey Yarn.
The Golden Retriever’s pendant ears hang close to the cheeks with soft rounded tips — large enough to frame the face but always lying gently flat against the sides of the head.
Rnd 1: MR, 5 sc into ring. [5]
Rnd 2: inc in each st around. [10]
Rnd 3: (1 sc, 1 inc) x 5. [15]
Rnd 4: (2 sc, 1 inc) x 5. [20]
Rnd 5: (3 sc, 1 inc) x 5. [25]
Rnd 6–10: sc in each st around. [25] (5 rounds)
Rnd 11: (3 sc, 1 dec) x 5. [20]
Rnd 12: sc in each st around. [20]
Rnd 13: (2 sc, 1 dec) x 5. [15]
→ Do not stuff — fold the ear flat so both layers align evenly at the opening before closing.
Work 7 sc through both layers at once to close the ear base. [7 closing stitches]
Fasten off. Leave a 14-inch tail for sewing to the head.
[IMAGE: two completed warm golden honey-colored floppy ears laid flat on a white surface, showing rounded tips and even layered shaping before head attachment]
Body

Honey Yarn.
The Golden Retriever body is well-proportioned and deep-chested — broader through the chest and ribcage with a gentle, natural taper toward the hindquarters.
Rnd 1: MR, 6 sc into ring. [6]
Rnd 2: inc in each st around. [12]
Rnd 3: (1 sc, 1 inc) x 6. [18]
Rnd 4: (2 sc, 1 inc) x 6. [24]
Rnd 5: (3 sc, 1 inc) x 6. [30]
Rnd 6: (4 sc, 1 inc) x 6. [36]
Rnd 7: (5 sc, 1 inc) x 6. [42]
Rnd 8–13: sc in each st around. [42] (6 rounds)
Rnd 14: (5 sc, 1 dec) x 6. [36]
Rnd 15: sc in each st around. [36]
Rnd 16: (4 sc, 1 dec) x 6. [30]
Rnd 17: sc in each st around. [30]
Rnd 18: (3 sc, 1 dec) x 6. [24]
→ Begin stuffing the body firmly at this point; continue as the opening closes.
Rnd 19: (2 sc, 1 dec) x 6. [18]
Rnd 20: (1 sc, 1 dec) x 6. [12]
Rnd 21: dec x 6. [6]
Fasten off. Leave a 12-inch tail for sewing.
Front Legs (Make 2)

Honey Yarn.
The Golden Retriever’s front legs are straight, sturdy, and medium-length with gently rounded paws — they give the seated piece a stable, upright posture.
Rnd 1: MR, 6 sc into ring. [6]
Rnd 2: inc in each st around. [12]
Rnd 3: BLO sc in each st around. [12]
Rnd 4: (1 sc, 1 dec) x 4. [8]
Rnd 5–10: sc in each st around. [8] (6 rounds)
→ Stuff lightly — front legs should remain slightly soft so they drape naturally against the body sides.
Fasten off. Leave a 10-inch tail for sewing.
Back Legs (Make 2)
Honey Yarn.
The Golden Retriever’s back legs are broader at the paw and upper thigh — the rounder haunches give the seated piece its characteristic stable, wide-set base.
Rnd 1: MR, 6 sc into ring. [6]
Rnd 2: inc in each st around. [12]
Rnd 3: (1 sc, 1 inc) x 6. [18]
Rnd 4: BLO sc in each st around. [18]
Rnd 5: (1 sc, 1 dec) x 6. [12]
Rnd 6–10: sc in each st around. [12] (5 rounds)
→ Stuff the paw end more firmly and leave the upper leg slightly softer for a natural seated splay.
Fasten off. Leave a 10-inch tail for sewing.
Feathered Tail
Honey Yarn.
The Golden Retriever’s tail is thick at the base, gently tapered, and carried level with the back — a defining breed silhouette detail that is essential to the finished piece.
Rnd 1: MR, 6 sc into ring. [6]
Rnd 2: inc in each st around. [12]
Rnd 3: (1 sc, 1 inc) x 6. [18]
Rnd 4–6: sc in each st around. [18] (3 rounds)
Rnd 7: (1 sc, 1 dec) x 6. [12]
Rnd 8–9: sc in each st around. [12] (2 rounds)
Rnd 10: dec x 6. [6]
→ Stuff lightly — the tail should be plump at the base and taper to a gently rounded tip.
Fasten off. Leave an 8-inch tail for sewing to the lower back of the body.
Chest Patch
Antique White Yarn.
The soft cream feathering on the Golden Retriever’s throat and sternum is a characteristic breed marking that adds color contrast and realism to the finished piece.
Row 1: Ch 5, sc in 2nd ch from hook, 2 sc, 3 sc in last ch; rotate, 2 sc, 2 sc in last ch. [10]
Rnd 2: inc, 2 sc, inc x 3, 2 sc, inc x 2. [16]
Rnd 3: sc in each st around. [16]
Rnd 4: sc in each st around. [16]
→ Do not stuff — flatten and press lightly before sewing to the front chest of the body.
Fasten off. Leave a 12-inch tail for sewing.
Assembly
Pin all pieces before sewing and check placement from multiple angles before committing any stitch.
- Embroider all face details — nose block, mouth line, and optional eyebrow stitches — onto the snout piece before attaching it to the head.
- Sew the snout to the lower center of the head so the top edge sits just below the safety eyes and the base aligns with the chin area.
- Pin both floppy ears to the upper sides of the head, base edges level with the top of the eyes and angled very slightly forward to match the Golden Retriever’s natural pendant ear set.
- Sew ears firmly through both fabric layers using the long tail, wrapping thread through multiple times for stability so the ear weight does not pull the attachment loose.
- Attach the head to the top center of the body, angled very slightly forward to give the seated Goldie a natural alert posture rather than a stiff upright position.
- Sew both front legs to the lower front sides of the body, pointing straight downward and set wide apart to match the breed’s broad-chested front stance.
- Sew both back legs to the lower rear sides of the body, angling outward and downward to create the characteristic wide, stable seated haunches.
- Sew the feathered tail to the lower center back of the body, positioned just above the base seam and angled very slightly upward.
- Sew the chest patch to the front center of the body, centering it between the front leg attachment points just below the chin area.
- Weave in all ends with at least two direction changes per tail and tug every sewn join firmly to confirm full security.
📸 Photo Tip: Place the finished Goldie on a clean white surface and shoot straight on at eye level — the warm golden coat and floppy ear drape read best front-facing and this exact angle matches the bestselling style for dog amigurumi pattern covers on Pinterest.
Face Details & Expression Options
Small adjustments to eye placement and embroidery angle create very different expressions on the finished Golden Retriever.
- Classic expression: Place 12mm eyes between Rnd 9 and 10, exactly 8 stitches apart, with a broad rectangular nose block and a gentle upward mouth curve for the breed’s famously friendly, open look.
- Breed signature gentle expression: Lower the eyes slightly to Rnd 10–11 and embroider two short angled eyebrow stitches above each eye in a darker gold floss to recreate the Golden’s characteristic soft, soulful gaze.
- Alert and happy variant: Place eyes at Rnd 8–9 with the mouth line curved more sharply upward at each corner for a bright, eager expression that captures the breed’s signature joyful energy.
- Child-safe fully embroidered version: Replace safety eyes with two circles of black satin stitch worked over 3 stitches in diameter, with a single white highlight stitch at the upper corner of each eye for dimension.
Finishing Touches
A few final details transform the crocheted Golden Retriever from a simple dog shape into a breed-accurate, polished amigurumi.
- Nose embroidery: Using black embroidery floss, work a wide rectangular block stitch at the center of the snout — fill it fully with close horizontal stitches, then add a short straight stitch downward and angle outward at each side for the mouth line.
- Shading detail: Lightly dust the inner ear area and around the outer snout edge with a warm brown chalk pastel to suggest the subtle darker shading that naturally frames a real Golden’s face.
- Breed accessory: Add a tiny crocheted red bandana tied around the neck — one of the most popular styling details for Golden Retriever amigurumi on Pinterest and Etsy.
- Final check: The finished piece should sit upright with both ears hanging symmetrically at the same height — gently reshape any piece with damp fingers and allow it to air-dry fully in position before photographing.
[IMAGE: finished warm golden honey-colored Golden Retriever amigurumi held in hand against a neutral white background, front-facing and well-lit, showing full scale, floppy ear drape, and cream snout and chest patch detail]
Color Guide
Golden Retrievers are officially recognized across a range of golden shades — each fully achievable with a single yarn swap using this same pattern.
| Color Variety or Marking | Yarn Recommendation |
|---|---|
| Light Golden | Caron Simply Soft “Soft Yellow” |
| Golden (Classic) | Lion Brand Pound of Love “Honey” |
| Dark Golden | Caron Simply Soft “Autumn Red” |
| English Cream / Pale Cream | Bernat Softee Baby “Buttercup” |
| Red Golden | Red Heart Soft “Copper” |
| Platinum / White Cream | Lion Brand Pound of Love “Fisherman” |
| Most Popular on Pinterest | Golden (Classic) |
Beginner Tips
These five tips are specific to the Golden Retriever’s construction and will save significant time and frustration on your first build.
- Most important shaping technique: Pinch the snout into a wide rectangular shape before it fully sets — the Golden’s broad, flat muzzle is the single detail that separates it from a generic dog face.
- Most common beginner mistake: Attaching the floppy ears too far back on the skull produces a hound-dog look — always pin them at the widest point of the head, level with the eyes, before committing to sewing.
- Tension advice: Keep tension extra firm on the head and snout pieces — any looseness causes the safety eyes to shift and the broad muzzle to lose its flat profile after stuffing.
- Best assembly tip: Check both ears from directly in front before sewing — even a 1–2 stitch difference in ear height makes the finished Goldie look asymmetrical and off-breed.
- Most rewarding finishing detail: Brushing the finished tail and ear edges lightly with a pet slicker brush creates the soft, feathery fringe that makes the piece unmistakably, instantly recognizable as a Golden Retriever.
Troubleshooting
These are the three most common problems crafters encounter with this Golden Retriever pattern and exactly how to fix each one.
The Floppy Ears Won’t Lie Flat After Attachment
- Why it happens: The ear was closed too loosely or the yarn tension was too relaxed, causing the folded layers to spring open and push the ear forward instead of hanging flat.
- How to fix it: Flatten each ear firmly between your fingers, mist lightly with water, and pin flat to a foam mat to dry — this resets the shape without reworking the piece.
The Snout Looks Too Round Instead of Flat
- Why it happens: The snout was overstuffed or worked with too loose a tension, giving it a balloon shape rather than the Golden Retriever’s wide, flat rectangular muzzle profile.
- How to fix it: Stuff the snout with less fiberfill than feels natural and pinch the outer edge firmly into a gentle D-shape before sewing to flatten the front profile correctly.
The Golden Coat Color Looks Uneven Between Pieces
- Why it happens: Different dye lots of the same yarn color can vary noticeably in warmth and depth, which is especially visible with golden and honey tones worked across many separate pieces.
- How to fix it: Purchase all main coat yarn from a single skein or check dye lot numbers carefully at purchase — for small pieces like the ears, use yarn from the same end of the skein as the head.
Making It Bigger or Smaller
- Mini keychain version: Use fingering weight yarn with a US B/1 (2.25mm) hook for a finished size of approximately 2 inches tall seated — attach a split ring keychain through the top of the head before closing.
- Standard size: Work as written in this pattern using worsted weight and US G/6 (4.0mm) hook for a finished seated height of approximately 6 inches.
- Large cuddly version: Use bulky weight (#5) yarn with a US K/10.5 (6.5mm) hook for a finished seated height of approximately 10–12 inches — increase safety eye size to 18mm.
Safety Notice
- Safety eyes and small parts are a choking hazard for children under 3 — always embroider eyes and nose for baby and toddler gifts.
- Weave in every yarn end securely with at least 2 direction changes using a tapestry needle.
- Check all sewn joins are tight and secure before giving the finished piece to a child.
Free Printable Pattern
This pattern is free for personal use and for selling finished handmade items in small quantities — the pattern text itself may not be reproduced, resold, or redistributed; please link back to this page instead.
At standard font size this pattern prints to approximately 8–10 A4 pages including the full instructions, tables, and tip boxes.
Frequently Asked Questions
How long does this Golden Retriever crochet pattern take to complete?
Most crocheters complete the full project in 6–10 hours across 2–3 sittings. The floppy ears and nose embroidery are the most time-consuming individual steps.
Can I use DK weight yarn instead of worsted weight?
Yes — use a US E/4 (3.5mm) hook and expect a finished seated size of approximately 4–4.5 inches tall.
My floppy ears keep curling up instead of lying flat — how do I fix it?
Flatten each ear firmly, mist lightly with water, and pin flat to a foam mat to dry — this resets the shape without reworking the piece.
Can I substitute the magic ring with another method?
Yes — chain 2 and work all starting stitches into the second chain from the hook as a simple, straightforward alternative.
How can I customize this pattern to match my own real-life Golden Retriever?
Reference a clear photo of the dog in natural light to match the exact coat shade at a craft store. Custom pet portrait commissions in this style typically sell for $45–$120 depending on size and detail level.
Final Thoughts
The Golden Retriever is one of the most rewarding amigurumi breeds because the warm golden coat and floppy pendant ears make the finished piece instantly recognizable and deeply personal to any Goldie owner. No other breed has that same combination of gentle, soft silhouette and rich warm color that reads so clearly and immediately in yarn.
The floppy ear attachment and snout shaping take the most patience — but nailing both transforms the piece from a generic dog shape into an unmistakable, recognizable Goldie. Every extra minute spent on those two details is fully visible in the finished result.
Share the finished piece on Pinterest with a clean white background photo — that single image style consistently drives saves and repins for dog breed amigurumi patterns. Happy crocheting! 🐾