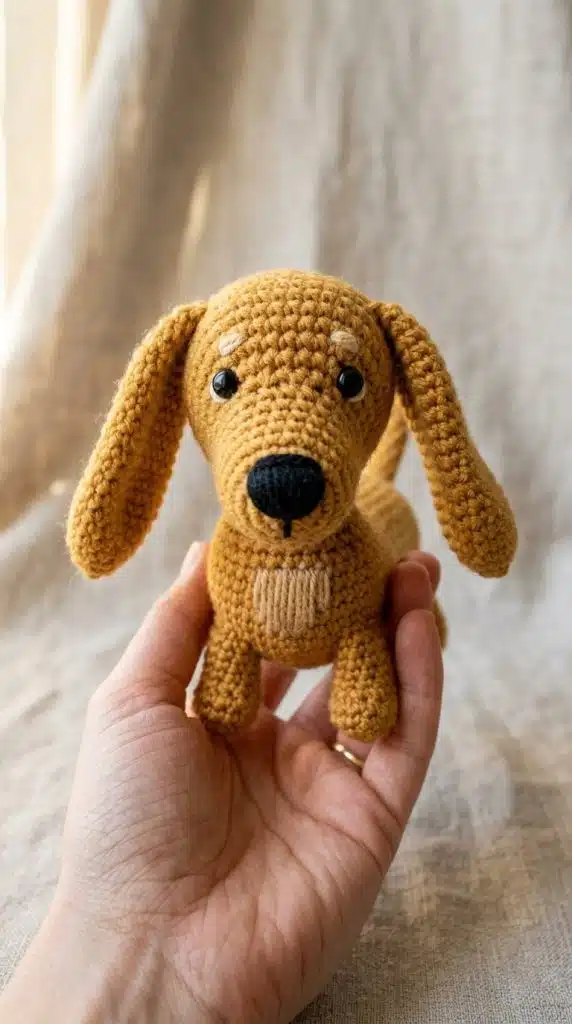
The Dachshund’s impossibly long body and short stubby legs make this breed one of the most distinctive to recreate in yarn — that stretched sausage silhouette is unmistakable at any scale. Those soft floppy ears and long tapered muzzle lock in the look from every angle.
This free pattern walks you through every step to crochet a Dachshund amigurumi approximately 8cm tall and 18cm long in a seated position, designed for beginner to intermediate crocheters to complete in one weekend. Let’s get started!
📋 Pattern Details
| Detail | Info |
|---|---|
| Skill Level | Beginner – Intermediate |
| Finished Size | Approx. 8cm tall / 18cm long seated |
| Yarn Weight | Worsted weight (#4) |
| Hook Size | US G/6 (4.0mm) |
| Estimated Time | 6–10 hours |
| Techniques Used | Magic ring, sc, inc, dec, BLO, working in rows |
| Safety Eyes | 12mm, black |
Materials
Gather everything before starting — swapping yarn mid-project creates visible tension and texture differences between pieces.
Yarn
- Red/Tan Coat (Main Color) — Worsted weight (#4) — Lion Brand Pound of Love in “Honey” — approx. 150–180 yds — this warm golden-brown captures the classic red Dachshund coat with clean, even stitch definition.
- Tan Points (Markings) — Worsted weight (#4) — Red Heart Soft in “Buff” — approx. 30–40 yds — used for the eyebrow dots, paw tips, inner ear accent, and chest patch markings on classic red/tan Dachshunds.
- Embroidery Detail — Black embroidery floss — approx. 3–5 yds — for the nose outline, mouth line, and accent stitches above each eye.
🎨 Color Swap Note: For a black and tan Dachshund, replace the main coat color with Lion Brand Pound of Love “Black” and keep the same Red Heart Soft “Buff” for all tan point markings — the pattern remains identical.
Tools & Notions
- US G/6 (4.0mm) crochet hook
- Polyester fiberfill / toy stuffing
- Two 12mm black safety eyes
- Black embroidery floss (nose and face detail)
- Tapestry needle
- Stitch marker
- Scissors
- Straight pins
⚠️ Safety Note: Safety eyes and all small sewn parts are choking hazards for children under 3 — always embroider all facial features for infant and toddler gifts.
Abbreviations
These are the crochet abbreviations used throughout this pattern.
| Abbreviation | Meaning |
|---|---|
| ch | Chain |
| st | Stitch |
| sc | Single crochet |
| inc | Increase — 2 sc in 1 st |
| dec | Decrease — sc2tog worked through front loops (invisible decrease) |
| sl st | Slip stitch |
| R | Round |
| Row | Row |
| ( ) x# | Repeat instructions in parentheses the stated number of times |
| magic ring | Adjustable starting ring |
| BLO | Back loops only |
Before You Begin
- Spiral rounds: This pattern is worked in continuous spiral rounds unless rows are specified — do not join rounds with a slip stitch or add a turning chain.
- Stitch marker: Place a stitch marker or scrap of contrast yarn into the first stitch of each new round so you always know exactly where the round begins.
- Both loops: Work through both loops of every stitch unless the pattern specifically calls out BLO or FLO in that round.
- Stuffing: Stuff each piece firmly as you go — waiting until the piece is fully closed makes even, lump-free stuffing nearly impossible.
- Tension: Your finished size will vary with yarn weight and personal tension — if stuffing shows through the fabric when stretched gently, go down one hook size.
Construction Overview
Here is how this Dachshund amigurumi is constructed before you begin.
- All main structural pieces — head, body, front legs, back legs, and tail — are crocheted in continuous spiral rounds.
- The ears are crocheted flat in rows rather than in the round, which produces the long soft oval shape of a Dachshund’s floppy ear without requiring any wire or internal support.
- The muzzle is crocheted separately in the round, then sewn unstuffed and flat onto the face, keeping it wide and slightly raised rather than round.
- The body uses an intentionally extended straight section of 13 uninterrupted even rounds to recreate the Dachshund’s signature elongated sausage shape — this section must not be shortened.
- All pieces are made separately and assembled after — the head attaches to the front narrow end of the body, and the legs are sewn to the underside of the body in a low-clearance stance.
- Tan point markings — eyebrow dots, paw tips, and chest patch — are added as the final finishing layer after full assembly.
The Pattern
Head
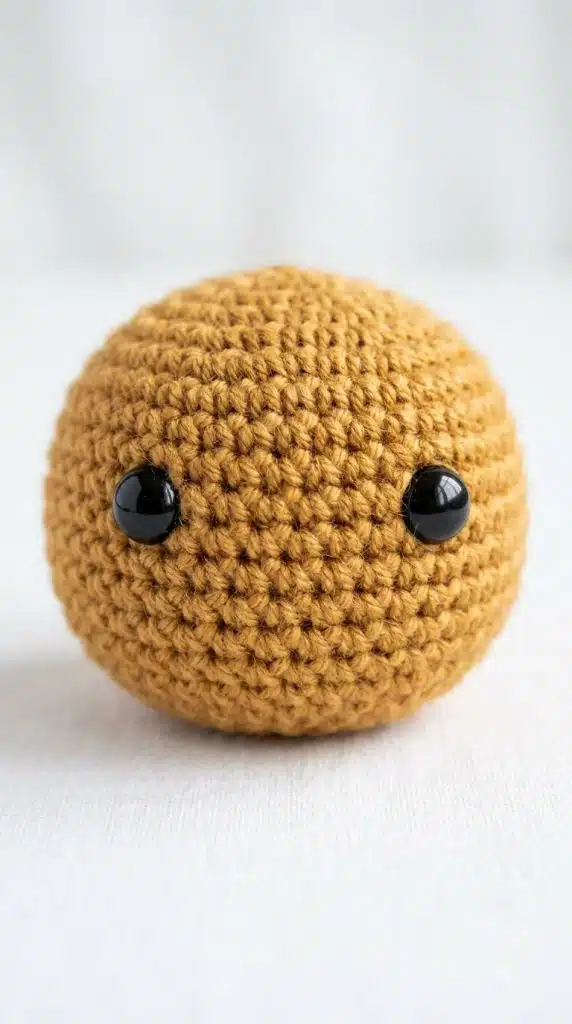
Honey (Red/Tan) Yarn.
R 1. 6 sc in magic ring. (6)
R 2. inc x 6. (12)
R 3. (1 sc, 1 inc) x 6. (18)
R 4. (2 sc, 1 inc) x 6. (24)
R 5. (3 sc, 1 inc) x 6. (30)
R 6. (4 sc, 1 inc) x 6. (36)
R 7.–R 10. 1 sc in each st around. (36) (4 rounds)
→ Safety eye placement: Insert 12mm black safety eyes between R 8–9, approximately 7 stitches apart, positioned slightly toward the outer sides of the broad forehead — Dachshunds have wide-set eyes that sit forward on the face.
Get Free Dog Health Tips!
Weekly guides on keeping your dog healthy & happy
🔒 No spam. Unsubscribe anytime.
R 11. (4 sc, 1 dec) x 6. (30)
R 12. (3 sc, 1 dec) x 6. (24)
R 13. (2 sc, 1 dec) x 6. (18)
Note: Begin stuffing the head firmly at this point; continue adding stuffing as the opening closes.
R 14. (1 sc, 1 dec) x 6. (12)
R 15. dec x 6. (6)
Fasten off. Leave a 12-inch tail; close the 6-stitch gap with the tapestry needle and set aside.
💡 Tip: Stuff the head extra firmly before closing — the long muzzle and floppy ears add forward weight once assembled, and an under-stuffed head tilts toward the floor instead of holding its position.
Muzzle
The Dachshund muzzle is long and slightly tapered — worked separately and sewn flat to give the breed its distinctive elongated hound profile.
Honey (Red/Tan) Yarn.
R 1. 6 sc in magic ring. (6)
R 2. inc x 6. (12)
R 3. (1 sc, 1 inc) x 6. (18)
R 4.–R 6. 1 sc in each st around. (18) (3 rounds)
Note: Do not stuff — flatten the muzzle gently between finger and thumb before pinning and sewing, keeping it wide and flat rather than rounded.
Fasten off. Leave a 14-inch tail for sewing to the head.
Ears (make 2)

The Dachshund’s long, soft floppy ears are worked flat in rows to produce the correct draping oval silhouette — no wire or pipe cleaner needed.
Honey (Red/Tan) Yarn.
Ch 4.
Row 1. From 2nd ch from hook, 3 sc. Ch 1, turn. (3)
Row 2. 1 inc, 1 sc, 1 inc. Ch 1, turn. (5)
Row 3. 1 inc, 3 sc, 1 inc. Ch 1, turn. (7)
Row 4.–Row 10. 1 sc in each st across. Ch 1, turn. (7) (7 rows)
Row 11. 1 dec, 3 sc, 1 dec. Ch 1, turn. (5)
Row 12. 1 dec, 1 sc, 1 dec. (3)
Fasten off. Leave a 10-inch tail for sewing to head.
💡 Tip: Do not add pipe cleaners or wire to these ears — the flat crocheted fabric folds and hangs naturally once attached, which is exactly the soft floppy drape that defines the Dachshund ear.
Body
The body is the defining piece of this entire pattern — the 13-round straight section is what creates the Dachshund’s iconic sausage silhouette.
Honey (Red/Tan) Yarn.
R 1. 6 sc in magic ring. (6)
R 2. inc x 6. (12)
R 3. (1 sc, 1 inc) x 6. (18)
R 4. (2 sc, 1 inc) x 6. (24)
R 5. (3 sc, 1 inc) x 6. (30)
R 6. (4 sc, 1 inc) x 6. (36)
R 7. (5 sc, 1 inc) x 6. (42)
R 8.–R 20. 1 sc in each st around. (42) (13 rounds)
R 21. (5 sc, 1 dec) x 6. (36)
R 22. 1 sc in each st around. (36)
R 23. (4 sc, 1 dec) x 6. (30)
Note: Begin stuffing the body firmly at this point — pack the straight middle section especially firmly to preserve the elongated shape; continue stuffing as the opening closes.
R 24. (3 sc, 1 dec) x 6. (24)
R 25. (2 sc, 1 dec) x 6. (18)
R 26. (1 sc, 1 dec) x 6. (12)
R 27. dec x 6. (6)

Fasten off. Close the 6-stitch gap with the tapestry needle and set aside.
💡 Tip: R 8.–R 20. is the entire secret of the Dachshund silhouette — resist any urge to shorten it, because removing even two rounds will make the body look like a generic round dog rather than a recognizable Dachshund.
Front Legs (make 2)
Dachshund front legs are notably short and sturdy, set directly beneath the wide chest in a low-clearance stance.
Honey (Red/Tan) Yarn.
R 1. 6 sc in magic ring. (6)
R 2. inc x 6. (12)
R 3. Work BLO: 1 sc in each st around. (12)
R 4. (1 sc, 1 dec) x 4. (8)
R 5.–R 8. 1 sc in each st around. (8) (4 rounds)
Note: Stuff lightly — front legs should be soft enough to hold their angle flat against the body without splaying outward when the finished piece is set down.
Fasten off. Leave a 10-inch tail for sewing.
Back Legs (make 2)
The back legs are slightly wider at the haunch to reflect the Dachshund’s broader rear stance and seated splay.
Honey (Red/Tan) Yarn.
R 1. 6 sc in magic ring. (6)
R 2. inc x 6. (12)
R 3. (1 sc, 1 inc) x 6. (18)
R 4. Work BLO: 1 sc in each st around. (18)
R 5. (1 sc, 1 dec) x 6. (12)
R 6.–R 9. 1 sc in each st around. (12) (4 rounds)
Note: Stuff the paw end slightly more firmly and leave the upper leg section softer so it presses flat against the underside of the body naturally when sewn in position.
Fasten off. Leave a 10-inch tail for sewing.
Tail
The Dachshund tail is medium length and gently tapered, carried in a soft natural curve away from the hindquarters.
Honey (Red/Tan) Yarn.
R 1. 6 sc in magic ring. (6)
R 2.–R 4. 1 sc in each st around. (6) (3 rounds)
R 5. (2 sc, 1 inc) x 2. (8)
R 6.–R 8. 1 sc in each st around. (8) (3 rounds)
Note: Stuff very lightly or leave the narrow tip section unstuffed — the tail should be pliable enough to hold a slight natural curve rather than standing rigid.
Fasten off. Leave an 8-inch tail for sewing.
Chest Patch
The classic Dachshund chest patch is a subtle but breed-accurate tan marking on the lower chest and throat.
Buff (Tan Points) Yarn.
R 1. Ch 5, sc in 2nd ch from hook, 2 sc, 3 sc in last ch; rotate and continue along the other side, 2 sc, 2 sc in last ch. (10)
R 2. 1 inc, 2 sc, inc x 3, 2 sc, inc x 2. (16)
R 3. 1 sc in each st around. (16)
Note: Do not stuff — flatten and press the piece lightly before sewing it to the front chest of the body so the edges lie completely flat.
Fasten off. Leave a 12-inch tail for sewing.
Assembly

Now bring all the parts together.
Attach the Head
- Pin the head to the narrow end of the body, positioning it slightly forward rather than straight upright so the finished Dachshund has a natural seated lean.
- Check from the side before sewing — the Dachshund’s neck is low-set, so the head should sit close to the body with minimal gap at the neck join.
- Sew through both layers in a full circle using the long yarn tail, passing through the join 2–3 times to create a secure connection strong enough to support the weight of the ears.
Position and Sew the Ears
- Hold each ear flat against the side of the head with the wide attachment edge sitting alongside the eye line and the long ear body draping downward past the cheek.
- Pin both ears simultaneously before sewing either one — check from directly in front that both ears hang at exactly matching heights and angles.
- Sew along the full top edge of each ear using the long yarn tail, wrapping through the fabric twice to keep each ear hanging flat and level without bunching at the base.
Install the Eyes and Nose
- Confirm safety eye placement between R 8–9, 7 stitches apart, and ensure both eyes are completely level before pressing the locking washers into position — they cannot be repositioned once locked.
- Pin the muzzle flat to the lower center of the face, with the top edge sitting just beneath the safety eyes and the base aligning with the chin area.
- Embroider the nose and face detail on the muzzle before it is fully sewn down, while the piece is still easy to hold and rotate freely.
Sew on the Legs and Tail
- Position the front legs on the underside of the body approximately 3 stitches back from the head attachment point, angled straight downward with a very slight outward angle to match the breed’s wide-chested stance.
- Place the back legs at the rear section of the body underside, angled downward and slightly outward so the finished piece sits flat and stable on a surface without rocking.
- Attach the tail to the center back of the rear end of the body, curving it gently upward before securing the final wrap — this matches the Dachshund’s natural relaxed tail carriage.
Sew on the Chest Patch
- Center the chest patch on the front underside of the body between the two front leg attachment points, pressing all edges completely flat against the body fabric.
- Sew around the full perimeter using matching Buff yarn and small invisible stitches so the patch edges remain clean, flat, and secure with no lifting corners.
Final Shaping
Use the blunt tip of a tapestry needle and gentle finger pressure to ease the body into an even cylinder — press any uneven stuffing bumps smooth from outside until the sausage shape is consistent from end to end.
Finishing Touches
Final details are what separate a well-made amigurumi from a truly polished finished piece.
- Embroidery detail: Using black embroidery floss, stitch a wide inverted T-shape nose at the muzzle tip, add two short curved jowl lines downward from the outer muzzle edges, then use Buff yarn to add two small oval eyebrow dots directly above each safety eye — these tan eyebrow markings are a breed-defining feature on real Dachshunds.
- Shading or color detail: A very light dusting of brown chalk pastel or matte brown eyeshadow blended softly onto the muzzle sides and the inner surface of each ear adds natural depth and muzzle shading — completely optional but adds significant realism to the finished piece.
- Optional accessory: A tiny rolled felt collar in red or forest green, secured with a small jump ring “tag” stitched at center front, suits the Dachshund’s famously bold personality and makes the finished piece instantly gift-ready.
- Final check: The finished Dachshund should have a body clearly at least twice as long as the head diameter, four short legs sitting evenly beneath the underside, and two long floppy ears hanging level past the cheek line on each side.
Troubleshooting
Every part of this pattern has at least one common failure point — here are the three most likely problems and exactly how to solve them.
My Body Doesn’t Look Long Enough
- Why it happens: Reducing or skipping rounds from the straight even-sc section (R 8.–R 20.) is the most common cause — each round removed shortens the sausage body by approximately 4–5mm.
- Fix: If the body looks too short after closing, carefully open the decrease end, add extra stuffing while physically elongating the straight section with your fingers, and re-close before sewing the head.
My Ears Are Uneven
- Why it happens: Sewing one ear at a time without pinning both in position first causes the second ear to be placed by eye, and eye-only placement almost always produces a height or angle mismatch.
- Fix: Always pin both ears at the same time and verify from directly in front before sewing either one — a difference of even two rows in attachment height reads as clearly uneven on the finished piece.
My Muzzle Looks Round Instead of Flat
- Why it happens: Any stuffing inside the muzzle, or sewing it against an under-stuffed section of the head, creates a rounded protruding bump rather than the flat, slightly raised profile the breed requires.
- Fix: Flatten the muzzle completely between finger and thumb immediately before pinning, and ensure it attaches against a firmly stuffed section of the head — a soft landing surface allows the muzzle to sink inward and distort.
Can I Sell Items Made From This Pattern?
- Free patterns: Finished handmade items made from free patterns are generally fine to sell in small quantities — always credit pethow.co.uk as the original pattern source when listing online or at craft fairs.
- Paid patterns: Always check the specific designer’s license terms before selling finished items made from paid patterns — terms vary significantly between individual designers and pattern publishers.
- Original designs: If you develop your own significantly adapted version of this pattern, you have full freedom to sell those finished items under your own brand and pricing.
Finished Dachshund amigurumi pieces sell on Etsy and at US craft fairs for approximately $40–$90 depending on size, yarn quality, the level of custom coloring detail, and whether tan point markings are included.
Frequently Asked Questions
What yarn is best for a Dachshund amigurumi?
Smooth worsted weight yarn with an even, consistent twist gives the cleanest stitch definition for the elongated body and flat ears. Lion Brand Pound of Love and Red Heart Soft are both widely available at Joann, Michaels, and Hobby Lobby and perform consistently for amigurumi.
Can I make this pattern bigger or smaller?
Use fingering weight yarn with a US B/1 (2.25mm) hook for a 4cm keychain Dachshund, or bulky weight with a US J/10 (6.0mm) hook for a 15cm cuddly version — always keep the straight body section proportionally long in every size or the breed silhouette is lost.
How do I make this design child-safe?
Replace the 12mm safety eyes with black satin-stitch embroidery worked over 3–4 stitches in diameter, and add a single white highlight stitch at the upper corner of each eye — this removes all choking hazards and makes the finished piece safe for children under 3.
How do I know my stitch count is correct?
Count every stitch at the end of every single round without exception — never skip counts or catch up after several rounds, as a one-stitch error at R 3 will compound into a visibly distorted shape by R 10.
Final Thoughts
The Dachshund is one of the most uniquely satisfying amigurumi projects because that stretched sausage body makes the finished piece recognizable from across a room — no other dog breed produces that silhouette in miniature yarn form.
Share your finished Dachshund on Pinterest with a clean white background photo and tag pethow.co.uk — every save and repin helps other crafters find this free pattern and inspires the next Dachshund owner to pick up a hook. Happy crocheting! 🐾