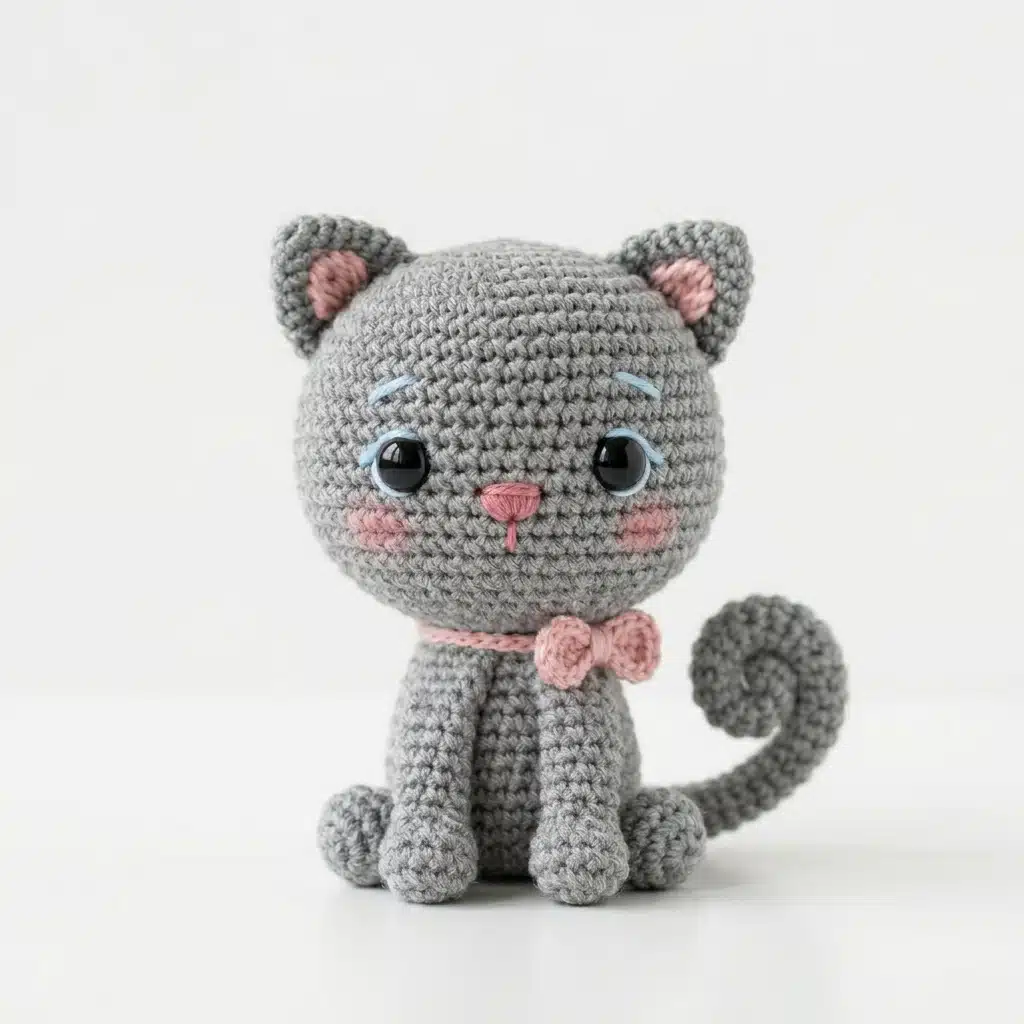
The kawaii kitten is one of the most irresistible amigurumi designs in the entire crochet world. That oversized round head, those wide dolly eyes, and the tiny bow at the neck make it impossible to scroll past — on Pinterest, on Etsy, or anywhere else handmade crafts are shared.
This grey version takes the classic kawaii kitten silhouette and gives it the colouring of a British Shorthair. The result is a little grey cat that looks like it belongs on a shelf, in a gift box, or in a photo that gets saved ten thousand times.
This pattern is 100% free — no email required, no sign-up, no download. It includes full round-by-round instructions for all 11 pieces, a complete materials list, detailed face embroidery guidance, a step-by-step assembly order, and a full colour guide so you can make this in any cat colour you love. Let’s get started.
Pattern At A Glance
| Skill Level | Beginner – Intermediate |
| Finished Size | Approx. 5–6 inches tall standing |
| Yarn Weight | Worsted weight (#4) |
| Hook Size | US G/6 (4.0mm) |
| Stitch(es) Used | Single crochet, slip stitch, chain |
| Techniques Used | Magic ring, invisible decrease, BLO, continuous rounds |
| Time to Complete | 5–8 hours |
| Stuffing Needed | Polyester fiberfill, medium amount |
| Safety Eyes | 12–14mm black safety eyes |
| Number of Pieces | 11 — Head, Body, 2 Ears, 2 Inner Ears, 2 Front Legs, 2 Back Feet, Tail, Bow |
| Yarn Colors Needed | 3 colors — grey main, blush pink inner ears, rose pink bow |
| Best Occasion / Use | Gift, nursery decor, cat lover present, shelf display, keepsake |
Why This Kawaii Kitten Works So Well

The secret to this design is the head-to-body ratio. The head is nearly twice the size of the body, which is what gives the finished piece its chibi cartoon quality.
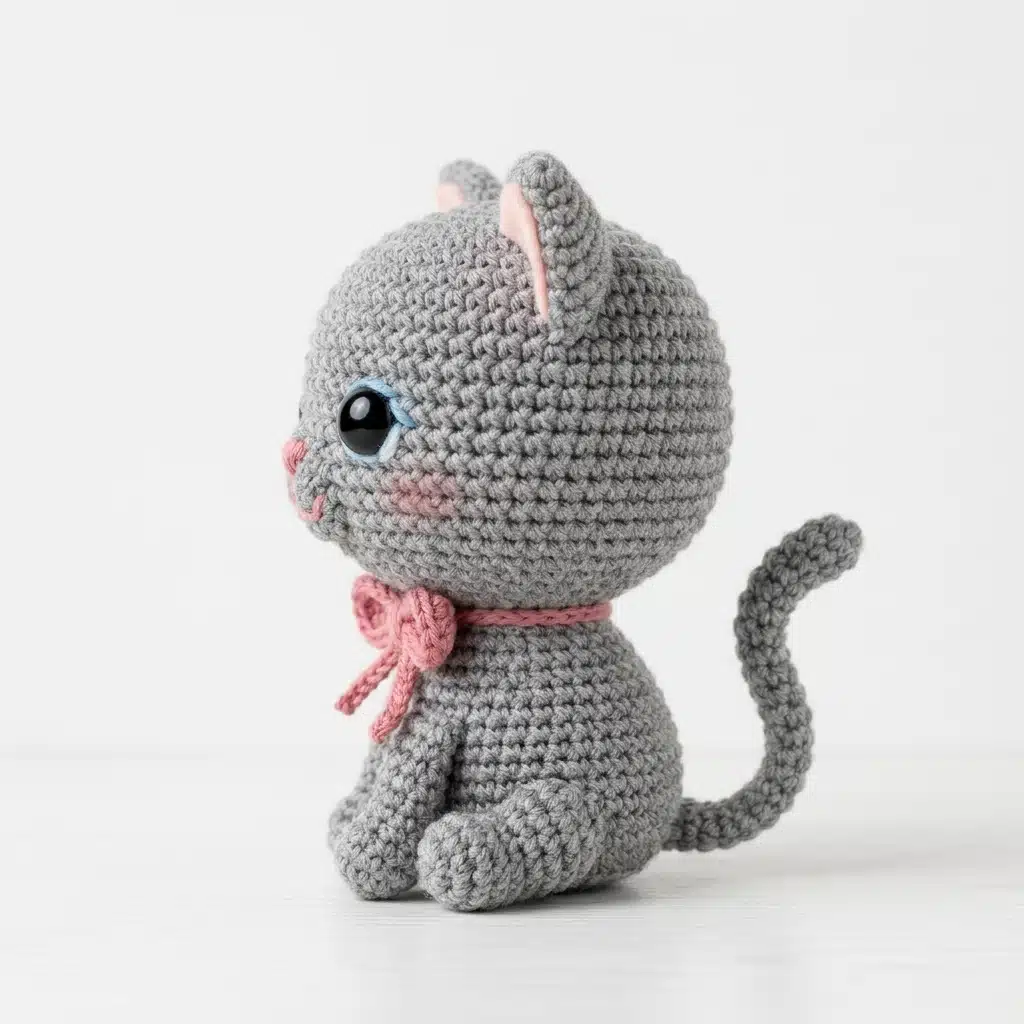
Every other design decision flows from that one choice. The legs are kept short and stubby so they never compete with the head visually. The tail is kept long and thin so it adds height without bulk. The bow sits at the neck junction and frames the face without covering it.
Get the head size right and everything else falls into place naturally.
Materials You Will Need

Gather everything before you begin — switching yarn mid-project creates visible tension and texture differences between pieces.
BEFORE YOU SCROLL PAST
Most Popular This Week: 👇
👉 Free Cocker Spaniel Crochet Pattern Beginner Friendly
👉 Border Collie Crochet Pattern Ideas
Yarn
- Main Coat Color — Approx. 150–170 yds — Caron Simply Soft in “Grey Heather” — this medium heather grey gives the finished kitten the warm, soft colouring of a British Shorthair with excellent stitch definition at worsted weight.
- Inner Ear Accent — Approx. 6–8 yds — Red Heart Soft in “Rose Pink” — the small blush triangles inside each ear add lifelike depth and contrast beautifully against the grey.
- Bow — Approx. 12–15 yds — Lion Brand Pound of Love in “Blush” or any rose pink worsted weight — the bow is the single most eye-catching detail on the finished piece and deserves a yarn with a clean, smooth finish.
Tools & Notions
- US G/6 (4.0mm) crochet hook
- Polyester fiberfill
- Two 12mm or 14mm black safety eyes
- Light blue embroidery floss (for eye shadow detail)
- Rose pink embroidery floss (for nose, mouth, cheek blush)
- Dark grey or black embroidery floss (for eyelash stitches)
- Tapestry needle
- Stitch marker
- Scissors
- Straight pins for piece placement before sewing
🛒 Yarn Tip: Heather grey yarns vary quite a bit between brands — Caron Simply Soft “Grey Heather” reads as a true mid-grey with a slight warm undertone, which photographs beautifully on white and cream backgrounds. Avoid cool blue-grey shades, which tend to look washed out in finished photos.
Abbreviations & Stitch Guide
This pattern uses US crochet terminology throughout.
| Abbreviation | Meaning |
|---|---|
| MR | Magic ring |
| ch | Chain |
| sl st | Slip stitch |
| sc | Single crochet |
| inc | Increase — 2 sc in the same stitch |
| dec | Invisible decrease |
| BLO | Back loop only |
| st(s) | Stitch(es) |
| rnd | Round |
| rep | Repeat |
| ( ) x# | Repeat the instructions in parentheses the stated number of times |
| [ ] | Total stitch count at the end of that round |
💡 Invisible Decrease Tip: Insert the hook under the front loop only of the next stitch, then the front loop only of the following stitch, and complete as a single crochet. This keeps the decrease hidden on the surface — essential for the smooth rounded head shape that defines this design.
Get Free Patterns Every Week!
Get new patterns, videos & tutorials free in your inbox
🔒 No spam. Unsubscribe anytime.
Gauge
Gauge: 4 stitches × 4 rows = 1 inch in single crochet using US G/6 (4.0mm) hook and worsted weight yarn.
For amigurumi, firm and even tension matters more than matching gauge precisely — your fabric should feel dense enough that no stuffing is visible when you gently stretch a panel.
Cute CAT Crochet Pattern Free— Complete Instructions
All pieces are worked separately and assembled at the end. Work in continuous rounds using a stitch marker at the start of each round. Count your stitches at the end of every round — a missed stitch in the head will show immediately in the shaping.
Head
The head is the centrepiece of this entire design. It should feel significantly larger and heavier than the body once stuffed — that size difference is what gives the finished kitten its kawaii character.
Rnd 1: MR, 6 sc. [6]
Rnd 2: Inc x6. [12]
Rnd 3: (Sc, inc) x6. [18]
Rnd 4: (2 sc, inc) x6. [24]
Rnd 5: (3 sc, inc) x6. [30]
Rnd 6: (4 sc, inc) x6. [36]
Rnd 7: (5 sc, inc) x6. [42]
Rnd 8: Sc around. [42]
Rnd 9: Sc around. [42]
→ Safety eye placement: Insert 12mm or 14mm black safety eyes between Rnds 9–10, approximately 10 stitches apart. Larger eyes placed slightly wider apart create the most dramatic kawaii expression.
Rnd 10: Sc around. [42]
Rnd 11: Sc around. [42]
Rnd 12: Sc around. [42]
Rnd 13: (5 sc, dec) x6. [36]
Rnd 14: (4 sc, dec) x6. [30]
Rnd 15: (3 sc, dec) x6. [24]
→ Begin stuffing the head very firmly at this point. Continue adding stuffing as the opening closes — the head should feel almost rigid.
Rnd 16: (2 sc, dec) x6. [18]
Rnd 17: (Sc, dec) x6. [12]
Rnd 18: Dec x6. [6]
Fasten off, leaving a 12-inch tail. Close the 6-stitch gap with the tapestry needle and set aside.

💡 Head Tip: Overstuff the head slightly — it will compress a little after assembly and the ears add weight at the top. A firmly stuffed head also makes eye placement easier to adjust before the washer locks in place permanently.
Body

The body is deliberately small relative to the head. Resist the instinct to make it bigger — the size contrast is intentional and essential.
Rnd 1: MR, 6 sc. [6]
Rnd 2: Inc x6. [12]
Rnd 3: (Sc, inc) x6. [18]
Rnd 4: (2 sc, inc) x6. [24]
Rnd 5: (3 sc, inc) x6. [30]
Rnd 6: Sc around. [30]
Rnd 7: Sc around. [30]
Rnd 8: Sc around. [30]
Rnd 9: (3 sc, dec) x6. [24]
Rnd 10: Sc around. [24]
Rnd 11: (2 sc, dec) x6. [18]
→ Begin stuffing the body firmly. Pack the bottom slightly more densely to create a flat base that helps the finished piece stand upright.
Rnd 12: Sc around. [18]
Rnd 13: (Sc, dec) x6. [12]
Rnd 14: Dec x6. [6]
Fasten off, leaving a 12-inch tail. Close the gap and set aside.
💡 Body Tip: The bottom of the body should be as flat as possible — pack the fiberfill into the base before closing and press it firmly against a flat surface. This flat-bottom effect is what lets the kitten stand upright without any additional support.
Ears (Make 2)
The ears on this kitten are small and softly triangular — not as sharp or angular as a realistic cat ear. That softer rounded shape is part of what makes the overall look feel kawaii rather than realistic.
Rnd 1: MR, 5 sc. [5]
Rnd 2: Inc x5. [10]
Rnd 3: (Sc, inc) x5. [15]
Rnd 4: Sc around. [15]
Rnd 5: Sc around. [15]
→ Do not stuff. Fold the ear flat so both layers align evenly at the opening.
Work 7 sc through both layers at once to close the ear base. [7 closing stitches]
Fasten off, leaving a 12-inch tail for sewing.
💡 Ear Tip: Before sewing the ears to the head, pinch the base of each ear very slightly inward from both sides — this gives the ear a gentle natural curve that matches how a real cat’s ear sits on its head rather than lying completely flat.
Inner Ears (Make 2)
Using rose pink yarn:
Ch 4.
Row 1: Sc in 2nd ch from hook, sc, sc. [3]
Row 2: Dec, sc. [2]
Row 3: Dec. [1] — pull tight to close.
Fasten off, leaving a 4-inch tail.
→ Sew one inner ear flat onto the front surface of each finished ear before attaching the ears to the head.
Front Legs (Make 2)
The front legs are short, stubby, and slightly rounded at the paw — they should dangle naturally at the front of the body rather than extending outward.
Rnd 1: MR, 6 sc. [6]
Rnd 2: Inc x6. [12]
Rnd 3: BLO sc around. [12]
Rnd 4: (Sc, dec) x4. [8]
Rnd 5: Sc around. [8]
Rnd 6: Sc around. [8]
Rnd 7: Sc around. [8]
Rnd 8: Sc around. [8]
→ Stuff lightly — the legs should be soft enough to position naturally against the body rather than sticking straight out.
Fasten off, leaving a 10-inch tail for sewing.
💡 Leg Tip: The BLO round at Rnd 3 creates a clean ridge around the paw that separates it visually from the leg — this small detail makes the finished paw look distinct and intentional rather than like an unbroken tube.
Back Feet (Make 2)
The back feet are small flat oval pads that anchor the base of the body and help the kitten stand upright. They are barely visible from the front but essential for stability.
Rnd 1: MR, 6 sc. [6]
Rnd 2: Inc x6. [12]
Rnd 3: BLO sc around. [12]
Rnd 4: (Sc, dec) x4. [8]
Rnd 5: Sc around. [8]
Rnd 6: Sc around. [8]
→ Do not stuff. Flatten the piece completely and work 4 sc through both layers to close.
Fasten off, leaving a 10-inch tail for sewing.
Tail
The tail is long and thin — one of the most distinctive details of this design. It curls upward from the lower back of the body and gives the finished piece height and movement.
Rnd 1: MR, 5 sc. [5]
Rnd 2–20: Sc around. [5]
→ Do not stuff, or stuff only the bottom 3 rounds very lightly. The tail should be flexible enough to curl and pose naturally.
Fasten off, leaving a 10-inch tail for sewing.
💡 Tail Tip: After sewing the tail to the body, use a few hidden stitches to tack the upper section of the tail gently against the body at the point where it begins to curl — this keeps the tail in its upward pose permanently rather than flopping sideways.
Bow
The bow is made in rose pink yarn and is the single most eye-catching detail on the finished piece. A clean, tight bow centre is what separates a polished result from a flat one.
Using rose pink yarn:
Ch 16.
Row 1: Sc in 2nd ch from hook, sc across. [15]
Rows 2–6: Ch 1, turn, sc across. [15]
Fasten off, leaving an 8-inch tail.
To shape the bow: Pinch the rectangle firmly at the centre. Using a separate strand of rose pink yarn approximately 12 inches long, wrap tightly around the pinched centre 8–10 times. Pull firmly after each wrap. Tie off securely at the back and weave in the ends. The bow should hold its shape without the wrapping loosening.
💡 Bow Tip: The bow looks most polished when the centre wrap is as tight and narrow as possible — aim for a wrap width of about 3–4 stitches. A wide, loose centre knot makes the bow look limp rather than perky.
Face Details

The face embroidery is what turns a grey ball with safety eyes into a kawaii kitten. Take time with these details — they are the most photographed part of the finished piece.
Eye shadow: Using 2–3 strands of light blue embroidery floss, work a soft arch of straight stitches just above each safety eye, following the curve of the eye. This arched highlight is the defining feature of the kawaii doll eye expression.
Eyelashes: Using dark grey or black embroidery floss, work 2–3 short straight stitches radiating outward from the upper outer corner of each eye. Keep them short — 3–4mm maximum — so they read as lashes rather than whiskers.
Nose: Using rose pink embroidery floss, embroider a small inverted triangle at the centre of the face, positioned just below the midpoint between the two eyes. The nose should be small — no wider than 4–5 stitches across.
Mouth: Work a single short straight stitch downward from the bottom point of the nose triangle, approximately 2–3 stitches long.
Cheek blush: Using rose pink embroidery floss, work a small cluster of satin stitches in a soft circle on each cheek, positioned below and outside each eye. Alternatively, a light application of chalk or fabric blush with a cotton bud gives a more airbrushed effect. The cheek blush is optional but significantly adds to the kawaii expression.
Assembly — Putting Your Kawaii Kitten Together
Pin every piece before sewing and check placement from the front, side, and above before committing any stitch.
- Complete all face embroidery on the head first, before the head is attached to anything else. Working on the detached head gives you full access from all angles.
- Sew the inner ear accent onto the front face of each ear. Press flat and align carefully — the pink triangle should sit centred in the lower half of the ear.
- Pin both ears to the top of the head, with the base edges approximately 6 stitches apart. The ears should angle very slightly outward rather than pointing straight up — this gives the kitten a soft, alert expression rather than a rigid one.
- Sew the ears firmly through both fabric layers using the long tail, anchoring through several rounds of head stitches for security.
- Attach the back feet to the underside base of the body first, positioning them side by side at the front of the base so the kitten leans very slightly forward when placed on a flat surface.
- Sew both front legs to the lower front of the body, hanging downward and very slightly forward. The tops of the legs should align with approximately Rnd 10–11 of the body.
- Sew the tail to the lower center back of the body, with the base of the tail starting just above the body’s base seam. Tack the upper curve of the tail in place as described in the tail tip above.
- Attach the head to the top center of the body, positioning it very slightly forward so the kitten has a natural forward lean rather than sitting perfectly upright. The neck join should be invisible — sew through multiple rounds of both pieces.
- Tie the finished bow around the neck at the head-body junction and secure firmly with a few hidden stitches at the back so it cannot slip.
- Weave in every end with at least two direction changes and tug each sewn join firmly before considering the piece finished.
📸 Photo Tip: Place the finished kitten on a clean white or pale linen surface and photograph at exact eye level. The oversized head and bow read best straight-on — this angle is identical to the style used in top-performing Etsy listings for kawaii cat patterns.
Face Expression Options
Small changes to eye placement and embroidery create dramatically different expressions without changing a single stitch of the pattern itself.
Classic kawaii expression: Place 12mm eyes between Rnds 9–10, exactly 10 stitches apart, with the blush directly below each eye and lashes at the outer corner only.
Extra doe-eyed expression: Use 14mm eyes instead of 12mm, place them one round lower at Rnd 10–11, and increase the blush circles slightly. This creates the most exaggerated kawaii look.
Sleepy kitten expression: Replace safety eyes with embroidered curved lines — work a shallow arc of satin stitches approximately 8 stitches wide for each closed eye. Add extra blush and soften the mouth line. Perfect for a child-safe version.
Boy kitten variant: Swap the rose pink bow for a small crocheted bow tie in navy or forest green. Work the same bow pattern but in a darker yarn and position it flat across the chest rather than tied at the neck.
Grey Kawaii Kitten Colour Guide
The same pattern produces a completely different cat with a single yarn swap. Every colour below uses identical stitch counts — only the yarn colour and bow colour change.
| Coat Colour | Main Yarn | Best Bow Colour |
|---|---|---|
| Heather Grey (this pattern) | Caron Simply Soft “Grey Heather” | Rose pink or blush |
| Cream / White | Lion Brand Pound of Love “Antique White” | Baby blue or lavender |
| Black | Lion Brand Pound of Love “Black” | Hot pink or red |
| Fawn / Caramel | Caron Simply Soft “Buff” | Sage green or mustard |
| Blue-grey | Caron Simply Soft “Cobalt Blue” lightened with grey | White or ivory |
| Lilac | Loops & Threads Impeccable “Soft Violet” | Cream or gold |
| Chocolate brown | Red Heart Soft “Chocolate” | Peach or terracotta |
| Ginger tabby | Lion Brand Pound of Love “Butterscotch” + stripe embroidery | Forest green |
| Most Popular on Pinterest | Grey — this version | Rose pink |
Beginner Tips for the Best Results
These five tips are specific to the kawaii kitten’s construction and will save you significant frustration.
- Most important proportion tip: The finished head should feel noticeably heavier than the finished body when you hold both pieces in your hands. If they feel similar in weight and size, the head needs more stuffing before you close it.
- Most common beginner mistake: Placing the eyes too close together gives the kitten a cross-eyed look rather than the wide-set kawaii expression. Pin the eyes at 10 stitch intervals and step back to check before locking the washers.
- Most rewarding finishing detail: The light blue eye shadow embroidery above the safety eyes takes under ten minutes but transforms the finished piece from a standard cat amigurumi into a recognisable kawaii character. Do not skip it.
- Best tension advice: Keep the head and body stitches especially firm — any looseness in these two pieces allows the stuffing to show as lumps through the fabric after assembly.
- Most useful assembly trick: Use straight pins to position all pieces on the assembled head and body simultaneously before sewing any of them down. Seeing all the pieces placed at once lets you adjust the balance of the entire composition before anything is permanent.
Making It Bigger or Smaller

- Mini keychain version: Use fingering weight yarn with a US B/1 (2.25mm) hook for a finished height of approximately 2.5 inches. Attach a split ring keychain through the top of the head before closing. Use 6mm safety eyes.
- Standard size: Work as written using worsted weight and a US G/6 (4.0mm) hook for a finished standing height of approximately 5–6 inches.
- Large cuddly version: Use bulky weight (#5) yarn with a US J/10 (6.0mm) hook for a finished height of approximately 9–11 inches. Increase safety eye size to 18mm. The bow will need to be approximately 30% wider to stay in proportion.
Safety Notice
- Safety eyes are a choking hazard for children under 3 — always use the embroidered closed-eye version described above for baby and toddler gifts.
- Weave in every single end with at least 2 direction changes.
- Pull every sewn join firmly before gifting to confirm security.
- Check that all safety eye washers are locked completely flat against the back of the fabric before closing the head.
Free Printable Pattern Download
This pattern is free for personal use and for selling finished handmade items in small quantities. The pattern text itself must not be reproduced or resold — please link back to the original page at pethow.co.uk instead.
At standard font size this pattern prints to approximately 8–10 A4 pages including all instructions, tables, and tip boxes.
Frequently Asked Questions
How long does this kawaii kitten take to crochet?
Most crocheters finish the complete project in 5–8 hours across 2 sittings. The head is the most time-consuming piece. The bow and inner ears take under 15 minutes each.
Can I use DK weight yarn instead of worsted?
Yes — use a US E/4 (3.5mm) hook and expect a finished height of approximately 3.5–4 inches. The eye embroidery details will need to be scaled down slightly.
My kitten won’t stand upright — what’s wrong?
The most common cause is insufficient stuffing in the body base. Reopen the body seam, pack the base very firmly with fiberfill, and make sure the back feet are sewn flat against the front underside of the body. Also check that the head is attached very slightly forward of center — if the head sits too far back, the weight pulls the piece rearward.
Can I substitute the magic ring?
Yes — chain 2 and work all starting stitches into the second chain from the hook as a clean alternative.
What size safety eyes give the most kawaii look?
14mm eyes placed 10 stitches apart give the most exaggerated kawaii expression. 12mm eyes placed 9 stitches apart give a slightly more restrained but still very doll-like result. Both work well with this pattern.
How do I make the cheek blush look smooth?
The most consistent result comes from a cotton bud dipped very lightly in powdered fabric chalk or a children’s cosmetic blush. Press it in a circular dabbing motion rather than rubbing, and build the colour in layers. This gives a much softer result than embroidery floss for the blush circles.
Can I sell finished items made from this pattern?
Yes — you may sell finished handmade items made from this pattern in small quantities. Please credit pethow.co.uk as the pattern source. The pattern text itself may not be reproduced or resold.
Final Thoughts
The grey kawaii kitten is one of those designs where the finished piece genuinely surprises you. The proportion — that huge head balanced on a small barrel body — reads as slightly absurd in the flat pieces and then clicks into something completely charming the moment it is assembled.
The embroidery is the step that most crocheters want to skip. Do not skip it. Fifteen minutes of face detail work is what turns a grey sphere into something people will immediately want to pick up and hold.
Share the finished piece on a white or pale linen surface, photograph at exact eye level, and post to Pinterest with a clean simple caption. That combination consistently performs for kawaii amigurumi patterns. Happy crocheting! 🐾